How to Remodel An Old Basement From Start to Finish
There are a lot of issues when you look at that old, dusty basement. It's somewhat damp, dark, and possibly musty-smelling. Old holiday decorations and abandoned projects end up there. However, what if you could change that? At A&Z General Contractor, we’re well-equipped to help you tackle remodeling your old basement. There is a lot of potential in that unused area; it could be the starting point for your next big home renovation.
It could be a home gym, a home theater, a kid's play area, or even a suite that you rent out to earn extra money. You can make the transition from that eerie concrete box to a lovely living area. Let's take a step-by-step look at how to completely renovate an old basement.
Before You Swing a Hammer: The Planning Phase
It's important to have a carefully considered plan before starting any demolition. Careful planning is the foundation of a successful finished basement, and starting a remodeling project without it can quickly result in unforeseen expenses and complications.
Figure Out Your Budget (and Add 20%)
Setting up a clear budget for your basement renovation is a crucial first step. The project's scope, location, and existing square footage will all affect the final cost. Remodeling a basement usually costs between $20,000 and over $70,000. A 20% contingency fund should also be included to cover unforeseen costs that might come up after construction starts. This buffer helps keep the project from being disrupted by unanticipated problems.
Dreaming vs. Doing: Creating a Realistic Plan
The exciting part is about to begin. What would you like to do with this new extra room? To get a basic idea of the layout, grab a piece of paper and start sketching. Just like with kitchen remodeling in Lansdale, PA, creating a realistic plan for your basement begins with understanding how you want to use the space and what structural or code requirements may apply before construction begins.
Consider the space's intended use, such as a guest suite, home office, or recreation room. Do you require a restroom? Plumbing is required. Do you want a home theater? Sound requires special wiring, and a new light fixture requires precise placement.
Think about things like emergency escape routes and windows in the basement for natural light. Every basement bedroom must have an egress window according to numerous local building codes. Before you start building, you should be aware of these regulations because they also impact things like the minimum ceiling height.
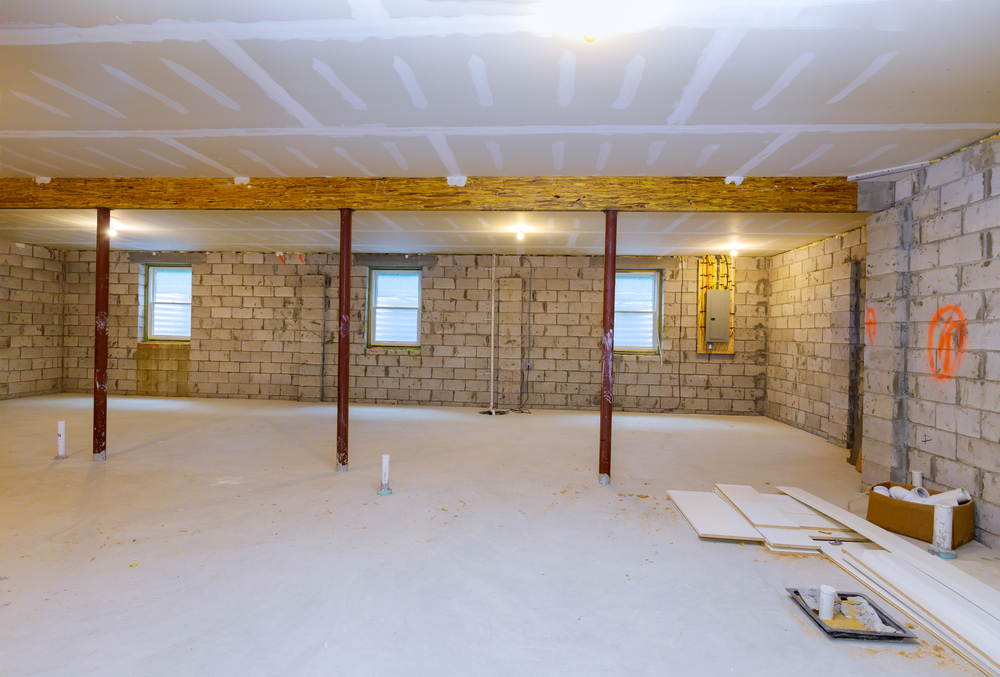
Prepping Your Old Basement for Its New Life
You have to deal with the old before you can construct anything new. Although this prepping labor can be tedious, it is the difference between a moldy, costly error and a lovely, cozy finished space. Don't skip this step.
The Big Clean Out
You must first clear everything out. Everything. You can free up valuable storage space by being ruthless and getting rid of items you haven't used in years.
After emptying it, thoroughly clean it. Scrub any mysterious stains, sweep the floors, and remove any cobwebs. Before the actual finishing work starts, you want a blank canvas on which to work.
Dealing with the Damp and Dark
Since basements are essentially holes in the ground, water is your worst enemy. In addition to being unpleasant to the senses, a damp basement can harbor harmful mold and mildew growth. For a cool basement, identifying and addressing moisture problems is a must.
Check the floor or walls of the basement for indications of water damage. Do you notice any visible wall cracks or dark patches on the concrete? Do the walls have a white, chalky material on them? They are warning signs.
To reduce the humidity, turn on a dehumidifier. The ideal indoor humidity range, according to the Environmental Protection Agency (EPA), is between 30 and 50 percent. This helps prevent mold from ever growing, but the only long-term solution is to address the water source.
Step-by-Step Guide on How to Remodel Old Basement Start to Finish
Okay, the area is prepared, dry, and planned. The actual work now starts. In order to help you know exactly what to anticipate when you create your new finished room, we'll walk you through the main construction steps.
Step 1: Check Your Foundation and Waterproof
Check your foundation's floor and walls carefully. Are there any large or small cracks visible in the concrete? While minor hairline cracks may be acceptable, larger ones should be examined by a professional before being concealed.
It's time to waterproof the wall in your basement. The interior concrete block can be painted using a waterproof sealant such as DRYLOK. Water cannot seep through the concrete because of the barrier this creates.
You may require a more robust solution for severe water issues. This can entail setting up a sump pump and French drain inside. To protect your investment, this work is essential.
Step 2: Framing the Walls
At this point, your floor plan begins to take shape. Building the metal or wood framework for your new walls is called framing. It is to which the drywall will eventually be attached.
Mark the locations of your walls on the floor with a chalk line and a measuring tape. After constructing the frames on the ground, carefully move them into position. Use concrete screws to fasten the top plate to the ceiling joists and the bottom plate to the concrete floor.
Because the bottom plate of your frame rests directly on the concrete, make sure it is made of pressure-treated wood. Any moisture will eventually cause regular wood to rot. Before fastening the plate, apply construction adhesive underneath it for an even better seal.
Step 3: Rough-Ins for Plumbing and Electrical
Rough-ins are necessary after the walls are framed but before drywall is installed. At this point, all of the pipes and wires are run through your newly constructed walls by plumbers and electricians. The location of everything is decided by this framing electrical phase.
At this point, faucets, drains, light switches, and electrical outlets are installed. You'll also run the wiring for all of your light fixtures, including any recessed lights. You'll always find a use for outlets, so make sure to plan for plenty of them.
Hire this work out unless you are a licensed professional. Nobody wants a plumbing leak inside a finished wall, and messed up electrical work is a major fire hazard. For good reason, your local government will probably demand permits and inspections for this type of work.
Step 4: Insulation is Your Best Friend
Due to the earth surrounding them, basements are inherently cold. Your new area will be much more comfortable with proper insulation, and your energy costs will go down. Over time, this is an investment that pays for itself.
You can choose from a variety of insulation options. Rigid foam board creates a vapor barrier and is excellent against concrete walls. Although spray foam insulation costs more, it produces an ideal air seal that eliminates all drafts. A traditional and reasonably priced option for in-between wall studs are fiberglass batts. Check the R-value guidelines specific to your climate zone.
Step 5: Hanging Drywall
Put on your protective gear and prepare for some dust. When you hang drywall, your basement starts to look like a real room instead of a construction site. It's an extremely thrilling moment and a significant visual shift.
A utility knife, drywall sheets, and drywall screws are some essential supplies. Lift each sheet carefully into position, then use screws to secure it to the studs, making sure to strike the center stud for a firm grip. To save time, use a nail gun that has a screw attachment.
After hanging the large drywall sheets on your studs, use drywall tape to seal the joints between the boards. Next, you apply joint compound, also known as mud, to the tape and screw heads. To achieve a smooth surface that is ready for painting, several coats are typically required, with extensive sanding in between.
1. Taping
Apply a thin layer of joint compound over a seam and press paper or mesh drywall tape into it.
Pro Tip: Use a 6-inch taping knife to smooth out the compound.
2. First Coat (Bed Coat)
Apply a wider coat of compound over the tape, feathering the edges. Cover all screw heads.
Pro Tip: Let it dry completely, which usually takes 24 hours.
3. Second Coat
Lightly sand any high spots, then apply another, wider coat of compound.
Pro Tip: Use a 10- or 12-inch knife to get a wider, flatter seam.
4. Final Coat & Sanding
Apply a very thin skim coat if needed. Once dry, sand everything for a smooth finish.
Pro Tip: Use a pole sander to make sanding large areas easier.
Don't forget the drywall ceiling. Renting a drywall lift from a hardware store is a great idea to help you lift and hold the heavy sheets in place, as this can be more difficult than walls.
Step 6: Choosing the Right Flooring
A floor that can withstand the special conditions of a basement is required. Moisture-resistant options are the best. There's a good reason why Luxury Vinyl Plank (LVP) is so popular.
It is long-lasting, completely waterproof, and has a realistic wood appearance. Laminate flooring is another excellent option; it is reasonably priced and available in a variety of styles. Another excellent choice is tile, particularly if heating coils are installed underneath for a warm floor.
Basements are not a good place for traditional hardwood flooring. If it gets wet, it will buckle and warp. Carpets can be used, but if it gets wet, you should use a synthetic carpet pad that won't grow mold.
Bringing It All Together: The Finishing Touches
The difficult part is over. The construction is finished. You can now finish remodeling your basement and concentrate on the details that make the area uniquely yours.
Painting and Trim Work
A room's vibe can be significantly altered by paint. Lighter colors usually work best in a basement. If you don't have a lot of natural light, whites, light grays, and gentle blues can help the room feel larger and lighter.
Use a high-quality primer first, especially on freshly installed drywall, when you're ready to begin painting. This improves paint adhesion and seals the surface. It's time to trim after painting the walls.
Remember the trim. Window trim, door casings, and baseboards give a room a refined, completed appearance. A miter saw is necessary to cut trim corners at a clean degree angle for a polished look. Attention to finishing details matters in every project, whether you're completing a basement or working with a deck building company in Lansdale, PA, where precision, clean lines, and quality craftsmanship bring the final design to life.
Lighting, Fixtures, and Furnishing
In a basement, good lighting is important. It is not practical to simply place a single lightbulb in the center of the completed ceiling. Depending on the purpose of the space, you should consider multiple sources of light.
For general ambient light, use recessed lighting. Set up task lighting above a bar or desk. To create a warm, inviting atmosphere, use table and floor lamps. You can quickly alter the mood of the space by dimming all of your lights.
You can now start decorating, install shelves for storage and display, and bring in furniture. This is where your vision comes to life. Your once-dark storage area has been transformed into a lovely and useful addition to your house.
Bringing Your Basement Remodel Together
Although the journey seems long at the onset, it becomes much more manageable when broken down. Careful planning and accurate execution of each step before going on to the next are crucial. You can avoid expensive errors and rework by using this method.
You started with a clear budget and plan, addressed the essential prep work, and moved step-by-step through the renovation process, from framing and flooring to waterproofing and final lighting touches. With expert coordination, a project like this can turn an unused basement into a functional, comfortable living area. A&Z General Contractor can help you plan, organize, and manage every stage of your renovation, making it easier to transform your vision into a beautifully finished space. Ready to bring your renovation plans to life? Contact A&Z General Contractor today to start planning your next home improvement project with a team that handles every detail from start to finish.


